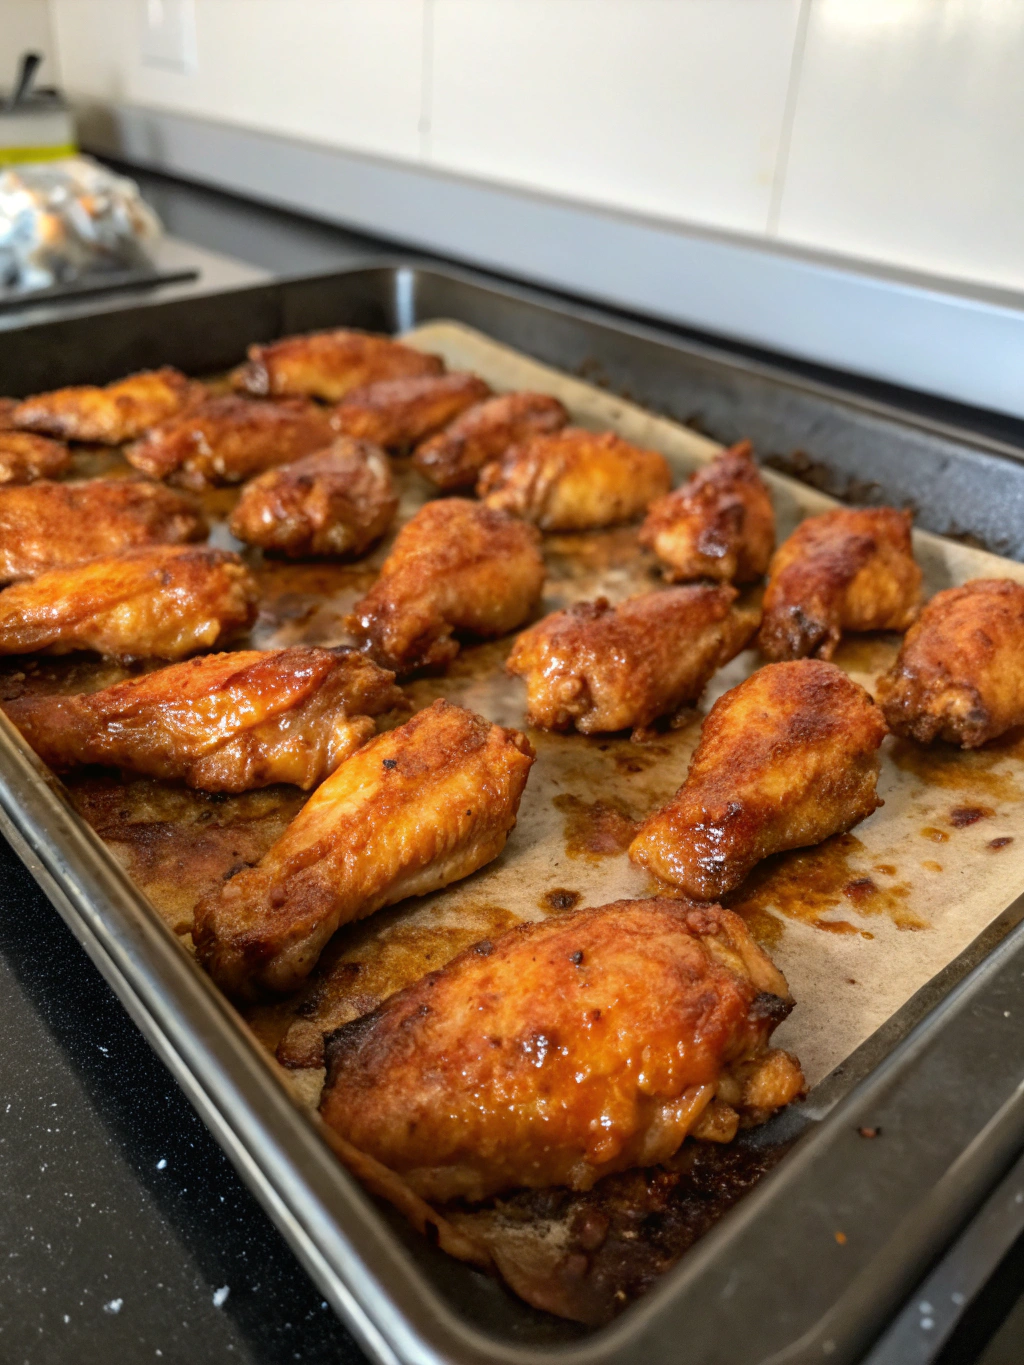
Chicken Wings in the Oven
These crispy, juicy chicken wings are baked to perfection with a mouthwatering blend of spices and a sticky-sweet glaze. Skip the deep fryer and discover how oven-baked wings can be just as delicious while being healthier and less messy to prepare.
Easy Chicken Wings in the Oven Recipe
There’s something undeniably satisfying about biting into a perfectly cooked chicken wing—that moment when the crispy exterior gives way to tender, juicy meat underneath. While many associate great wings with deep frying, this oven-baked method delivers that same irresistible texture with significantly less oil and hassle.
Chicken wings have long been a staple at game day gatherings and casual get-togethers, but they’re too delicious to save for special occasions. This recipe transforms the classic pub appetizer into an easy weeknight dinner option that the whole family will love. Fall and winter are perfect seasons for these oven-baked wings, when the warm oven and aromatic spices create a cozy atmosphere in your kitchen.
THIS RECIPE:
- Creates perfectly crispy chicken wings without deep frying
- Uses simple ingredients you likely already have in your pantry
- Can be easily customized with different sauces and flavor profiles
- Takes just 10 minutes of active prep time
| Recipe Details | Information |
|---|---|
| Prep Time | 10 minutes |
| Cook Time | 50 minutes |
| Total Time | 1 hour |
| Servings | 4-6 people |
| Yield | About 24-30 wings |
Making chicken wings in the oven is remarkably straightforward and delivers consistently excellent results. The secret lies in a simple baking powder technique that creates crackling crispy skin without deep frying. Whether you’re hosting a gathering or simply craving some comfort food on a weeknight, these wings are guaranteed to satisfy. Best of all, the oven does most of the work, allowing you to focus on preparing sides or simply relaxing while dinner cooks.
Ingredients for Chicken Wings in the Oven

The beauty of making chicken wings in the oven lies in the simplicity of ingredients. While the list below may seem lengthy, most items are pantry staples that create layers of flavor. Quality matters most with the wings themselves—look for plump, fresh chicken wings with good color and no off odors.
For the Wings:
- 3 pounds chicken wings, split into flats and drumettes
- 2 tablespoons baking powder (NOT baking soda)
- 3/4 teaspoon salt
- 1/2 teaspoon garlic powder
- 1/2 teaspoon paprika
- 1/4 teaspoon black pepper
For the Classic Buffalo Sauce (Optional):
- 1/3 cup unsalted butter, melted
- 1/2 cup hot sauce (like Frank’s RedHot)
- 1 tablespoon honey
- 1/2 teaspoon garlic powder
For Garnish (Optional):
- Chopped fresh parsley or cilantro
- Celery sticks
- Carrot sticks
- Blue cheese or ranch dressing for dipping
When selecting chicken wings, fresh is always best, but frozen wings work well too—just ensure they’re completely thawed and patted very dry before seasoning. The baking powder is crucial for achieving crispy skin, so don’t substitute baking soda, which has a different chemical composition and will make your wings taste metallic.
| Ingredient Category | Recommended Quantity | Quality Tips |
|---|---|---|
| Chicken Wings | 3 pounds (about 24-30 pieces) | Choose wings that are plump and pinkish in color with no dark spots |
| Seasonings | As listed per recipe | Use fresh spices for best flavor; replace any that are over 6 months old |
| Sauce Ingredients | Approx. 3/4 cup total | Use high-quality butter and authentic hot sauce for authentic flavor |
| Garnishes | As desired | Use crisp, fresh vegetables and high-quality dressings |
How to Make Chicken Wings in the Oven
Making perfectly crispy chicken wings in the oven relies on a few key techniques. The process is mostly hands-off, but paying attention to details like thoroughly drying the wings and using the right oven temperature will yield restaurant-quality results. The method below uses a two-temperature cooking process that renders the fat and then crisps the skin beautifully.
Prepare the wings:
- Preheat your oven to 250°F (120°C) and place an oven rack in the upper-middle position.
- Line a large baking sheet with aluminum foil and place a wire rack on top. Spray the rack with non-stick cooking spray.
- If your wings aren’t already split, cut them at the joints to separate the drumettes from the flats, and remove the wing tips.
- Pat the chicken wings VERY dry with paper towels. This is crucial for crispy skin.
Season the wings:
- In a large bowl, combine the baking powder, salt, garlic powder, paprika, and black pepper.
- Add the dried wings to the bowl and toss until they’re evenly coated with the seasoning mixture.
- Arrange the wings skin-side up on the prepared wire rack, making sure they’re not touching.
First bake (low temperature):
- Bake the wings at 250°F for 30 minutes. This low-temperature initial bake helps render the fat from under the skin.
- After 30 minutes, increase the oven temperature to 425°F (220°C) without removing the wings.
Second bake (high temperature):
- Once the oven reaches 425°F, continue baking the wings for 20-30 minutes until they’re golden brown and crispy.
- Rotate the pan halfway through this high-temperature bake for even browning.
Prepare sauce (if using):
- While the wings are in their final baking stage, prepare your sauce by combining the melted butter, hot sauce, honey, and garlic powder in a large bowl.
- Whisk until smooth and set aside.
Finish the wings:
- Remove the wings from the oven when they’re crispy and golden brown.
- If using sauce, add the hot wings to the sauce bowl and toss gently until evenly coated.
- If keeping them dry-rubbed, transfer them directly to a serving platter.
Rest briefly:
- Let the wings rest for 5 minutes before serving to allow the juices to redistribute and the sauce to set.
Pro tip: For extra-crispy wings, refrigerate the seasoned, raw wings uncovered for 8 hours or overnight before baking. This helps dry out the skin even further, resulting in maximum crispiness.
Tips for Making Chicken Wings in the Oven
The difference between good chicken wings and great chicken wings is in the details. These professional tips will elevate your homemade chicken wings in the oven to restaurant quality every time.
- Pat wings thoroughly dry – Moisture is the enemy of crispiness. Use multiple paper towels to remove as much surface moisture as possible.
- Don’t skip the baking powder – The alkaline nature of baking powder breaks down proteins in the chicken skin, allowing them to crisp more efficiently.
- Use a wire rack – Elevating the wings allows hot air to circulate all around them, creating even crispiness without the need to flip.
- Space wings properly – Overcrowding the pan creates steam, which prevents proper crisping. Leave at least 1/2 inch between each wing.
| Technique | Recommendation | Why It Works |
|---|---|---|
| Wing Prep | Pat completely dry and use baking powder | Removes moisture and creates chemical reaction for crispy skin |
| Baking Method | Two-temperature approach | Low temp renders fat, high temp creates crispy exterior |
| Equipment | Wire rack on baking sheet | Elevates wings for air circulation and prevents soggy bottoms |
| Sauce Application | Toss while wings are hot | Hot wings absorb sauce better for maximum flavor absorption |
The two-temperature baking method is critical—don’t be tempted to save time by just using the higher temperature. The initial low-temperature bake renders fat from under the skin, which is essential for achieving that perfect crispy texture in the second stage of cooking.
If you prefer extra-saucy wings, reserve half the sauce for tossing and serve the remaining sauce on the side for dipping or drizzling. This ensures the wings stay crispy while still providing plenty of flavor.
Make-Ahead Instructions
Chicken wings in the oven are perfect for meal prep and entertaining because several components can be prepared in advance. Here’s how to plan ahead:
You can season the wings with the baking powder mixture up to 24 hours in advance. After seasoning, arrange them on a wire rack set over a baking sheet, cover loosely with plastic wrap, and refrigerate. This extra time in the refrigerator actually improves the final texture by drying out the skin further.
Any sauces can be prepared up to 3 days ahead and stored in airtight containers in the refrigerator. Simply reheat the sauce gently before tossing with the hot wings.
For party planning, you can fully cook the wings up to 2 hours before serving. Keep them uncovered at room temperature, then reheat in a 350°F oven for 10-15 minutes just before serving. This maintains the crispy texture better than keeping them warm for extended periods.
If you need to prepare even further ahead, par-bake the wings through the low-temperature stage, cool completely, then refrigerate for up to 24 hours. Finish at the high temperature when ready to serve, adding an extra 5 minutes to the cooking time.
Storing Leftovers
Properly stored leftover chicken wings can maintain good quality for several days. Follow these guidelines to enjoy your wings beyond the initial meal:
Allow wings to cool completely before storing, but don’t leave them at room temperature for more than 2 hours for food safety. Place leftover wings in an airtight container, separating layers with parchment paper to prevent sticking.
Refrigerate promptly; properly stored wings will keep for 3-4 days in the refrigerator. For sauced wings, be aware that the longer they sit, the more the sauce will soften the crispy exterior.
To reheat refrigerated wings, place them on a wire rack over a baking sheet and warm in a 350°F oven for 10-15 minutes. Microwaving is not recommended as it makes the skin soggy and the meat rubbery.
Pro tip: If you know you’ll have leftovers, consider keeping some wings unsauced. Store the sauce separately and toss with the reheated wings just before serving for the freshest flavor and texture.
Freezing Chicken Wings in the Oven
Chicken wings freeze surprisingly well, making them perfect for meal prepping or preserving leftovers for future enjoyment. For best results, freeze wings before adding sauce.
To freeze cooked chicken wings, allow them to cool completely, then arrange in a single layer on a parchment-lined baking sheet. Freeze until solid, about 1-2 hours. Once frozen, transfer the wings to a heavy-duty freezer bag or airtight container, removing as much air as possible.
Properly wrapped, frozen chicken wings will maintain good quality for up to 3 months. Label your container with the date and contents for easy reference.
When ready to enjoy, thaw the wings overnight in the refrigerator. Reheat on a wire rack over a baking sheet in a 350°F oven for 15-20 minutes until heated through and crispy. If desired, toss with fresh sauce after reheating.
For best texture after freezing, you can also reheat wings directly from frozen. Place them on a wire rack over a baking sheet and bake at 350°F for 30-35 minutes, or until completely heated through and crispy.
Serving Suggestions
Elevate your chicken wings in the oven by creating a complete meal experience with these complementary sides and presentation ideas:
Classic Accompaniments:
- Crisp celery and carrot sticks provide refreshing crunch and coolness
- Blue cheese or ranch dressing for dipping both wings and vegetables
- Coleslaw with a vinegar-based dressing balances the richness of the wings
Heartier Side Dishes:
- French fries or sweet potato fries for an indulgent pub-style meal
- Creamy mac and cheese creates a comforting combination
- Corn on the cob with herb butter offers seasonal freshness
- A simple green salad with vinaigrette lightens the meal
For an attractive presentation, serve wings on a large platter with small bowls of different sauces nestled among them. Garnish with thinly sliced green onions, sesame seeds, or fresh herbs depending on your sauce flavor profile.
Beer is the classic beverage pairing for chicken wings—try an IPA to stand up to spicy Buffalo wings or a wheat beer for sweeter glazes. For non-alcoholic options, lemonade or iced tea provides refreshing contrast to the savory wings.
Serve wings hot from the oven for the best texture and flavor experience. If you’re hosting a gathering, consider setting up a wings station with different sauces so guests can customize their selections.
FAQ
Can I use frozen chicken wings for this recipe?
Yes, you can use frozen wings, but they must be completely thawed and patted very dry before proceeding with the recipe. Thaw them overnight in the refrigerator for best results. If you try to use wings that aren’t fully thawed, they’ll release too much moisture during baking and won’t crisp properly.
Why use baking powder on the wings?
Baking powder is crucial because it raises the pH level of the chicken skin, helping break down proteins and facilitating browning and crisping. Make absolutely sure you’re using baking powder and NOT baking soda, as baking soda will give your wings an unpleasant metallic taste.
Can I make these wings without the Buffalo sauce?
Absolutely! These wings are delicious with just the dry rub. You can also substitute any other wing sauce of your choice—try BBQ, teriyaki, lemon pepper, or honey garlic for variety. For dry-flavored wings, simply toss them in your favorite seasoning mix after baking.
My wings didn’t get as crispy as I’d like. What went wrong?
Several factors can affect crispiness: 1) Wings weren’t dried thoroughly before seasoning; 2) Oven temperature might be inaccurate (consider using an oven thermometer); 3) Wings were overcrowded on the baking sheet; or 4) The baking powder might be old and less effective. Also ensure you’re using the two-temperature baking method for optimal results.
Are these wings healthier than fried wings?
Yes, these oven-baked wings contain significantly less oil than deep-fried versions. The fat that renders during baking drips away from the wings, resulting in a lighter option that still delivers on flavor and texture. The exact calorie and fat reduction depends on your specific preparation method.