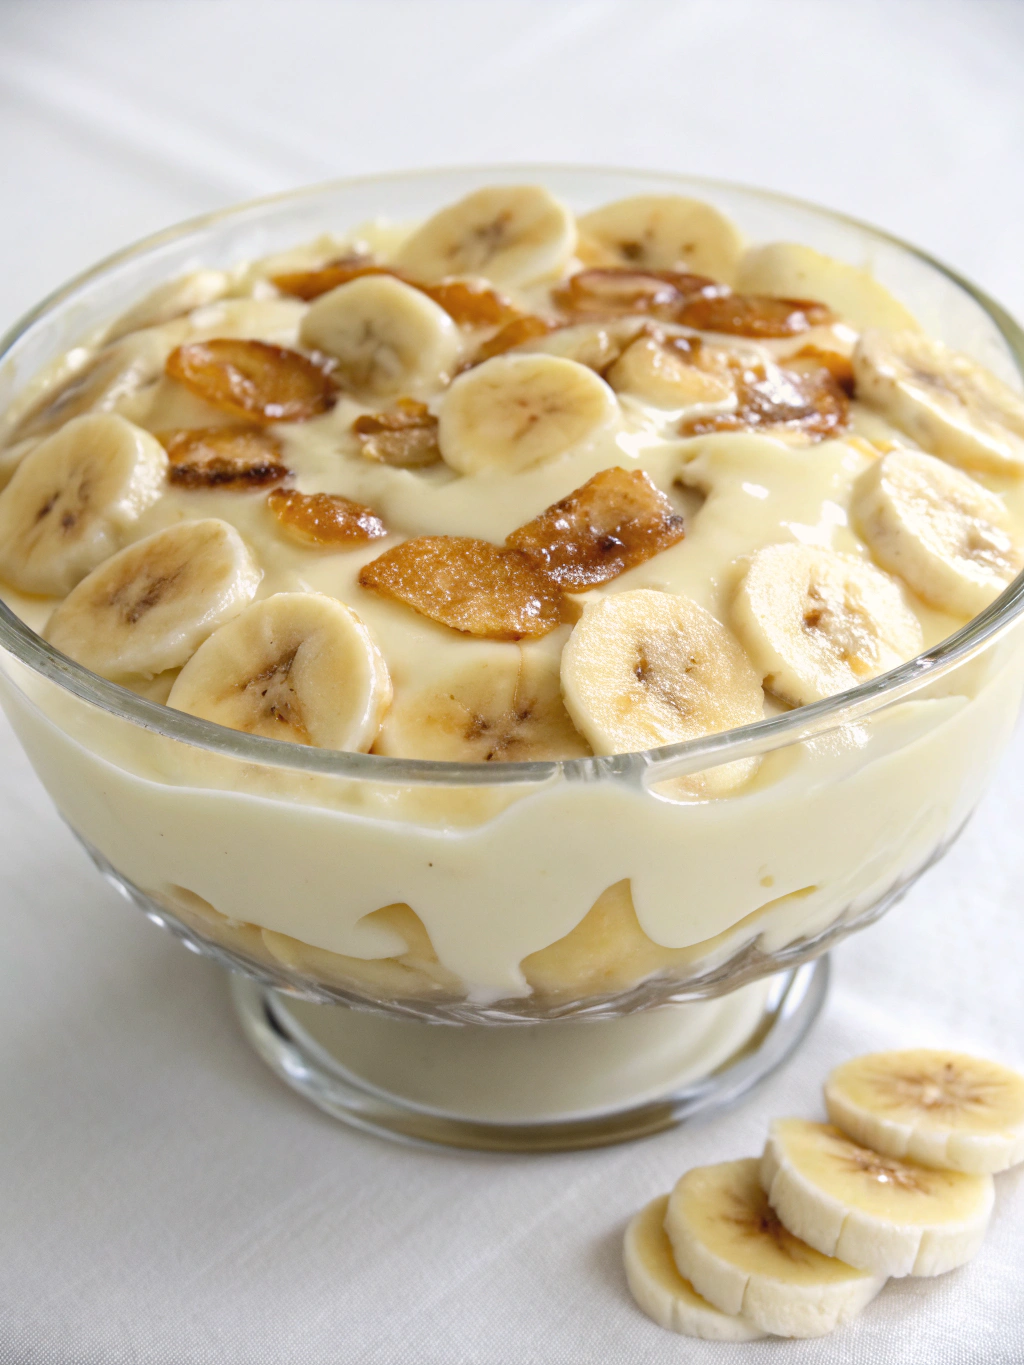
Banana Pudding with Condensed Milk
A silky-smooth, nostalgic dessert that combines layers of sweet vanilla pudding, fresh bananas, and crisp vanilla wafers for the perfect balance of creamy and crunchy textures. This homemade banana pudding with condensed milk creates an irresistibly rich dessert that’s surprisingly simple to make.
Easy Banana Pudding with Condensed Milk Recipe
There’s something magical about banana pudding with condensed milk that transforms a humble dessert into something extraordinary. This classic Southern treat has graced family gatherings and potlucks for generations, combining the perfect balance of creamy pudding, fresh bananas, and crisp vanilla wafers. Unlike many traditional recipes that require cooking a custard from scratch, this version uses sweetened condensed milk for an incredibly smooth texture and foolproof preparation.
Perfect for spring and summer gatherings, this banana pudding shines when fresh bananas are at their peak sweetness. The condensed milk adds that distinctive richness that makes this dessert so memorable – it’s the secret ingredient that elevates this banana pudding from good to unforgettable.
THIS RECIPE:
- Uses sweetened condensed milk for foolproof creaminess
- Requires zero baking or complicated techniques
- Can be prepared in advance for convenience
- Creates perfect individual servings or one showstopping trifle
| Recipe Details | Information |
|---|---|
| Prep Time | 25 minutes |
| Chill Time | 4 hours |
| Total Time | 4 hours 25 minutes |
| Servings | 10-12 servings |
| Yield | One 9×13 dish or individual serving cups |
What makes this banana pudding with condensed milk so appealing is its simplicity combined with spectacular results. The condensed milk creates a foolproof base that never curdles or separates, making this ideal for both novice and experienced dessert makers. With just a few minutes of active preparation, you’ll create a dessert that tastes like it took hours of careful attention.
Ingredients for Banana Pudding with Condensed Milk

The magic of homemade banana pudding with condensed milk starts with quality ingredients. Since this dessert features relatively few components, each ingredient plays a crucial role in the final flavor and texture. Ripe bananas with small brown spots provide the perfect sweetness, while using name-brand vanilla wafers ensures they’ll hold their texture when layered with the creamy pudding.
For the Pudding Layer:
- 1 (14-ounce) can sweetened condensed milk
- 1½ cups cold water
- 1 (3.4-ounce) package instant vanilla pudding mix
- 2 teaspoons pure vanilla extract
- 3 cups heavy whipping cream, divided
- 6-7 ripe bananas
- 1 (11-ounce) box vanilla wafer cookies (approximately 60-70 cookies)
- ¼ cup powdered sugar (for whipped topping)
- Optional garnish: additional vanilla wafers, banana slices, or crushed vanilla wafers
The quality of your condensed milk matters significantly in this recipe. Choose a reputable brand like Eagle Brand or Carnation for the best results. For bananas, look for ones that are yellow with small brown spots – these offer the perfect balance of sweetness and firmness. Bananas that are too green will lack flavor, while overly brown bananas may turn mushy too quickly.
| Ingredient Category | Recommended Quantity | Quality Tips |
|---|---|---|
| Bananas | 6-7 medium, ripe | Choose yellow bananas with small brown spots; avoid green or overly brown |
| Condensed Milk | 14 oz can | Use name brands like Eagle Brand or Carnation for consistent results |
| Vanilla Wafers | 11 oz box | Nilla Wafers hold up best; generic brands may become soggy faster |
| Heavy Cream | 3 cups total | Look for cream with at least 36% milk fat for best whipping results |
| Vanilla Extract | 2 teaspoons | Use pure extract rather than imitation for authentic flavor |
How to Make Banana Pudding with Condensed Milk
Creating the perfect banana pudding with condensed milk is all about proper layering and allowing adequate time for the flavors to meld together. The process is surprisingly simple, requiring no cooking or baking, yet the results are consistently impressive. The key is to follow the sequence carefully to ensure the pudding sets properly and the bananas remain fresh.
Prepare the pudding base:
- In a large mixing bowl, whisk together the sweetened condensed milk and cold water until well combined.
- Add the instant vanilla pudding mix and continue whisking for 2 minutes until the mixture begins to thicken.
- Stir in the vanilla extract, then set aside for 5 minutes to allow the pudding to thicken slightly.
Prepare the cream mixture:
- In a separate bowl, whip 2 cups of the heavy cream until stiff peaks form (reserve remaining 1 cup for topping).
- Gently fold the whipped cream into the pudding mixture until fully incorporated, creating a light, airy pudding base.
Prepare the bananas:
- Peel and slice the bananas into approximately ¼-inch rounds.
- If not assembling immediately, toss banana slices with 1-2 teaspoons of lemon juice to prevent browning.
Layer the pudding:
- In a 9×13 glass dish or trifle bowl, arrange a single layer of vanilla wafers covering the bottom.
- Add a layer of banana slices over the wafers, slightly overlapping them.
- Spread approximately one-third of the pudding mixture over the bananas.
- Repeat the layers twice more: wafers, bananas, pudding.
- Finish with a final layer of pudding on top.
Create the topping:
- In a clean bowl, whip the remaining 1 cup of heavy cream with ¼ cup powdered sugar until stiff peaks form.
- Spread or pipe the whipped topping over the final pudding layer.
- If desired, decorate with additional vanilla wafers, banana slices, or crushed wafers.
Chill thoroughly:
- Cover the pudding with plastic wrap, gently pressing it against the surface to prevent a skin from forming.
- Refrigerate for at least 4 hours, preferably overnight, to allow flavors to meld and wafers to soften slightly.
Tips for Making Banana Pudding with Condensed Milk
Creating the perfect banana pudding with condensed milk relies on a few key techniques that make all the difference. Follow these professional tips to elevate your dessert from good to spectacular:
Banana selection and preparation: Choose bananas that are ripe but still firm. The ideal banana for pudding has a bright yellow peel with small brown spots, indicating peak sweetness without mushiness.
Wafer layering strategy: Place wafers with the flat side down against the dish for the most stable base. For the prettiest presentation, place additional wafers around the perimeter of the dish standing upright.
Pudding consistency: For the perfect texture, don’t overmix the pudding once the whipped cream is added. Fold gently using a rubber spatula until just combined to maintain airiness.
| Technique | Recommendation |
|---|---|
| Whipping Cream | Chill bowl and beaters in freezer for 10 minutes before whipping for fastest, stiffest peaks |
| Banana Slicing | Cut bananas at a slight angle for larger, more attractive slices that cover more area |
| Layering Order | Always place wafers first, then bananas, then pudding for proper moisture absorption |
| Final Assembly | Complete assembly no more than 24 hours before serving for best texture |
Pro tip: For individual servings with beautiful visible layers, assemble in clear glasses or mason jars. This not only creates an impressive presentation but also helps maintain the perfect ratio of ingredients in each serving.
Make-Ahead Instructions
Easy banana pudding with condensed milk is an ideal make-ahead dessert, perfect for entertaining or holiday gatherings when you want to prepare components in advance:
You can prepare the pudding mixture (before adding bananas or wafers) up to 24 hours ahead. Store it covered in the refrigerator with plastic wrap pressed directly onto the surface to prevent a skin from forming. When ready to assemble, give it a quick stir before layering.
For the complete dessert, assemble no more than 8-12 hours before serving for optimal texture. The vanilla wafers need time to soften slightly from the pudding’s moisture, but waiting too long can make them overly soggy.
If preparing for a special occasion, you can prep all components separately: slice bananas (toss with a little lemon juice to prevent browning), make the pudding mixture, and have the vanilla wafers ready. Then quickly assemble 4-6 hours before serving.
Pro tip: If you need to prepare further in advance, consider making individual serving cups where you can control the amount of moisture contacting the wafers, helping them maintain their texture longer.
Storing Leftovers
Properly stored banana pudding with condensed milk will maintain its quality and food safety for several days after preparation:
Store leftover banana pudding in an airtight container in the refrigerator for up to 3 days. The texture is best within the first 48 hours, after which the bananas may begin to darken and soften further. Always use clean utensils when serving to prevent contamination that could shorten shelf life.
Glass containers with tight-fitting lids work best for storage as they don’t absorb odors and allow you to see the condition of the pudding. If using the original serving dish, cover tightly with plastic wrap or aluminum foil, pressing it gently against the pudding surface to minimize air exposure.
For individual portions, consider transferring leftovers to smaller containers to reduce the amount of air in contact with the pudding, which helps preserve freshness and prevent the top layer from drying out.
Freezing Banana Pudding with Condensed Milk
While banana pudding with condensed milk is at its best when fresh, you can freeze portions for later enjoyment with a few modifications:
For best results when freezing, prepare the pudding without the banana slices, as they tend to become mushy when thawed. Freeze the pudding base in airtight containers for up to 2 months. When ready to serve, thaw overnight in the refrigerator, then fold in freshly sliced bananas and additional vanilla wafers.
If freezing assembled pudding, use a freezer-safe glass or plastic container with a tight-fitting lid. Place a piece of plastic wrap directly on the pudding’s surface before securing the lid to prevent ice crystals from forming. Freeze for up to 1 month for best quality.
To thaw frozen banana pudding, transfer the container to the refrigerator for 24 hours. Avoid thawing at room temperature, which can cause condensation and affect texture. Once thawed, the texture may be slightly different from fresh pudding, but the flavor will still be delicious.
Serving Suggestions
Elevate your homemade banana pudding with condensed milk with these creative serving ideas:
Create an impressive dessert bar by serving individual portions in clear glasses or mason jars, accompanied by additional toppings guests can add themselves: toasted coconut, crushed vanilla wafers, chocolate shavings, or caramel sauce all make wonderful additions.
For a more elegant presentation, serve in stemmed glassware or champagne flutes with a small vanilla wafer perched on the rim and a pirouette cookie or chocolate stick standing upright. Dust lightly with cinnamon or cocoa powder just before serving.
Banana pudding pairs beautifully with coffee-based beverages like cappuccino or espresso. For a special dessert, offer small cups of banana pudding alongside demitasse spoons and espresso for a delightful contrast of hot and cold.
Pro tip: Serve banana pudding slightly chilled but not ice-cold (remove from refrigerator 15-20 minutes before serving) to experience the full depth of flavors. Cold temperatures can mute sweetness and nuance.
FAQ
Can I use banana pudding mix instead of vanilla pudding mix?
Yes, you can substitute banana pudding mix for the vanilla pudding mix. This will intensify the banana flavor in the dessert. However, the classic recipe uses vanilla pudding to allow the fresh banana flavor to shine through without becoming overwhelming.
How can I prevent my bananas from turning brown in the pudding?
The most effective strategy is to toss your sliced bananas in 1-2 teaspoons of lemon juice before adding them to the pudding. The acidity helps prevent oxidation. Additionally, ensuring your banana slices are completely covered by pudding will slow browning. For presentation purposes, save a few fresh banana slices to add just before serving.
Can I make this recipe without an electric mixer?
Absolutely! While an electric mixer makes whipping the cream easier, you can use a manual whisk with a little extra effort and time. For the pudding mixture, a regular whisk works perfectly. If whipping cream by hand, use a large metal bowl that’s been chilled in the freezer for about 15 minutes first, which will help the cream whip faster.
What’s the best substitute for sweetened condensed milk if I don’t have any?
While condensed milk creates the signature flavor and texture, in a pinch you can substitute 1 cup of heavy cream mixed with ¾ cup of granulated sugar (heated until sugar dissolves, then cooled). The texture will be slightly different, but still delicious. For a closer match to the original recipe, it’s worth waiting until you can purchase sweetened condensed milk.
Can I make this recipe dairy-free or with alternative milks?
Yes, this recipe can be adapted for dietary restrictions. Use dairy-free whipped topping (like CocoWhip) and dairy-free vanilla pudding mix. For the condensed milk, you can find coconut condensed milk at many grocery stores, which works well as a substitute. Note that the texture may be slightly different, but the layering technique and overall approach remain the same.