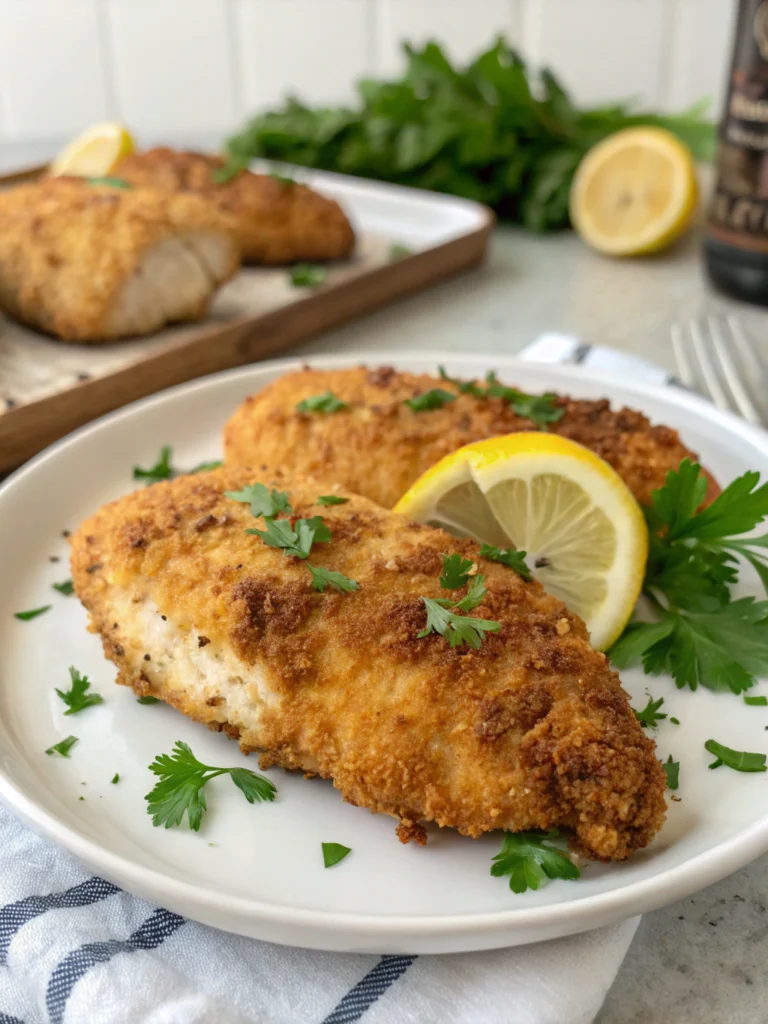
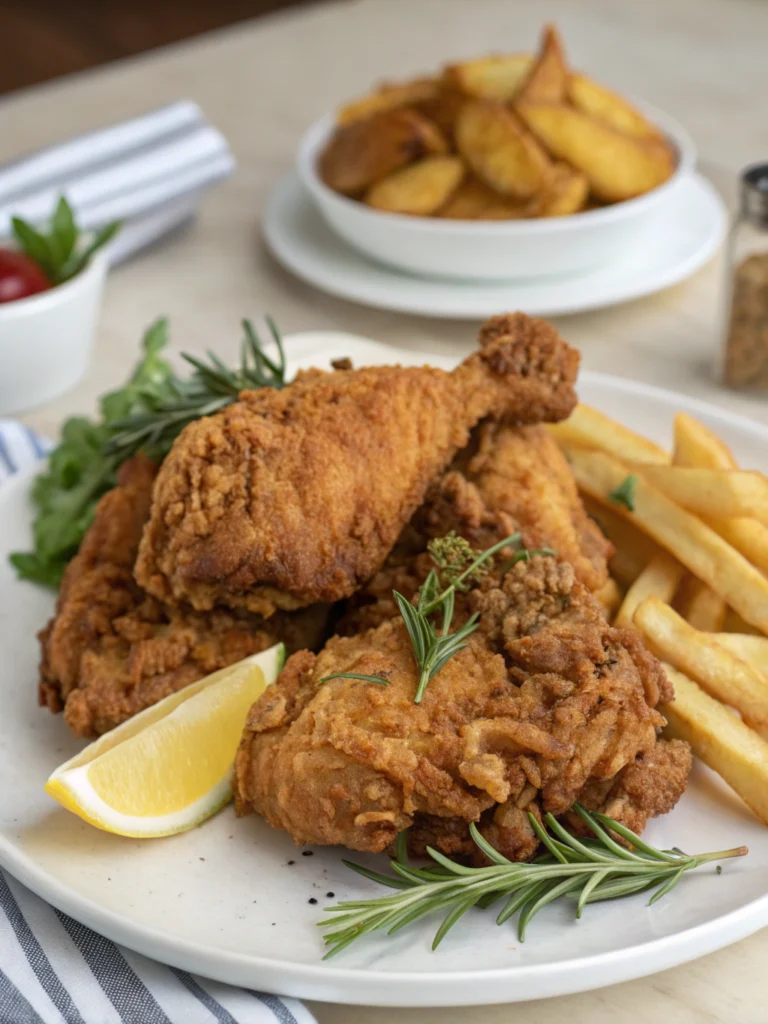
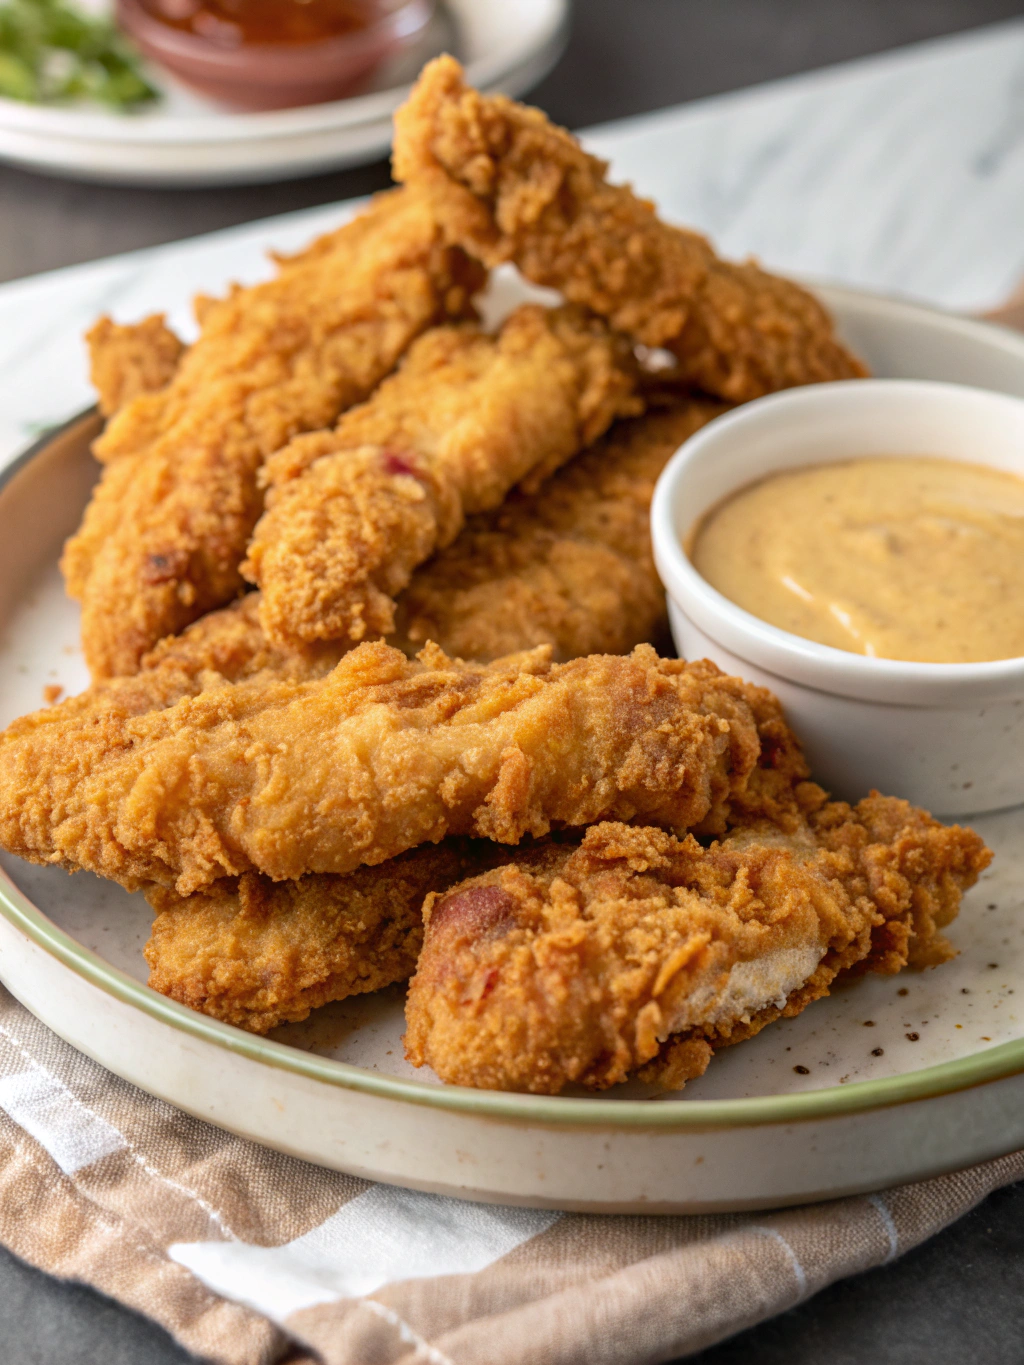
Fried Chicken Tenders
These perfectly crispy homemade fried chicken tenders feature juicy, seasoned chicken strips encased in a golden, crunchy coating that’s utterly irresistible. Ready in under 30 minutes, they’re guaranteed to be a family favorite!
Easy Fried Chicken Tenders Recipe
There’s something magical about biting into a perfectly fried chicken tender – that satisfying crunch giving way to tender, juicy meat inside. This homemade fried chicken tenders recipe captures that magic in your own kitchen, without any fancy equipment or culinary school training required. While they’re perfect year-round, these tenders make especially wonderful summer picnic fare or cozy winter comfort food when everyone is craving something warm and satisfying.
THIS RECIPE:
- Creates restaurant-quality chicken tenders with simple pantry ingredients
- Features a double-dredging technique for extra crispiness
- Works perfectly with either a deep fryer or stovetop method
- Includes a foolproof seasoning blend that appeals to all ages
| Recipe Details | Information |
|---|---|
| Prep Time | 15 minutes |
| Cook Time | 10 minutes |
| Total Time | 25 minutes |
| Servings | 4 portions (12-15 tenders) |
| Yield | About 1 pound of chicken tenders |
This easy fried chicken tenders recipe transforms ordinary chicken into crispy, golden perfection with minimal effort. The beauty lies in its simplicity—no complex techniques or hard-to-find ingredients, just straightforward steps that deliver restaurant-quality results. Whether you’re cooking for picky kids or discerning adults, these tenders consistently earn rave reviews for their perfect balance of seasoning and incredible texture.
Ingredients for Fried Chicken Tenders

The key to extraordinary fried chicken tenders lies in using quality ingredients. Fresh chicken and the right blend of seasonings make all the difference between an ordinary dish and something truly memorable. For best results, choose fresh, never-frozen chicken tenderloins when available.
For the Chicken:
- 1½ pounds chicken tenderloins (about 12-15 pieces)
- 1 teaspoon kosher salt
- ½ teaspoon freshly ground black pepper
- 1 teaspoon garlic powder
- ½ teaspoon paprika
For the Buttermilk Marinade:
- 2 cups buttermilk
- 1 tablespoon hot sauce (like Tabasco or Frank’s Red Hot)
- 1 teaspoon salt
For the Coating:
- 2 cups all-purpose flour
- 1 tablespoon seasoned salt
- 1 tablespoon garlic powder
- 2 teaspoons onion powder
- 2 teaspoons paprika
- 1 teaspoon cayenne pepper (adjust according to heat preference)
- 1 teaspoon dried thyme
- 1 teaspoon black pepper
For Frying:
- 4-6 cups vegetable oil or peanut oil (enough for 2 inches in your cooking vessel)
| Ingredient Category | Recommended Quantity | Quality Tips |
|---|---|---|
| Chicken | 1½ pounds fresh tenderloins | Look for plump, pinkish pieces without brown spots or a strong odor |
| Buttermilk | 2 cups | Full-fat provides the best tenderizing effect; if unavailable, mix 2 cups milk with 2 Tbsp lemon juice |
| Flour | 2 cups all-purpose | Unbleached gives a slightly better flavor, but bleached works fine too |
| Oil | 4-6 cups | Choose oils with high smoke points; peanut oil adds flavor but vegetable oil is more allergen-friendly |
| Seasonings | As listed above | Use fresh spices (replaced within 6 months) for maximum flavor |
How to Make Fried Chicken Tenders
Creating perfectly fried chicken tenders is all about mastering the right sequence of steps. The double-dredging technique used here ensures each tender has that ideal crispy exterior while keeping the meat inside moist and flavorful. Temperature control is crucial throughout the process.
Prepare the chicken:
- Pat chicken tenders dry with paper towels
- Season directly with salt, pepper, garlic powder, and paprika
- If tenders are very large, slice them lengthwise into more manageable pieces
Marinate the chicken:
- In a large bowl, whisk together buttermilk, hot sauce, and salt
- Add seasoned chicken to the buttermilk mixture
- Cover and refrigerate for at least 30 minutes (or up to 4 hours for deeper flavor)
Prepare the dredging station:
- In a shallow dish, combine flour with all seasoning ingredients
- Mix thoroughly with a fork to ensure even distribution
- Reserve about ¼ cup of the buttermilk marinade in a separate small bowl
Heat the oil:
- Pour oil into a large, heavy-bottomed pot or deep cast-iron skillet
- Heat oil to 350°F (175°C) using a kitchen thermometer to monitor temperature
- Prepare a wire rack set over a baking sheet for draining
Dredge the chicken:
- Remove one chicken piece from the marinade, allowing excess to drip off
- Dredge thoroughly in the seasoned flour mixture, pressing gently to adhere
- Dip briefly back into the reserved buttermilk
- Dredge a second time in the flour mixture, creating a shaggy coating
- Place on a plate and repeat with remaining chicken
Fry the chicken tenders:
- Carefully lower 3-4 tenders into the hot oil (don’t overcrowd)
- Maintain oil temperature between 325-350°F during cooking
- Fry for 3-4 minutes until golden brown and crispy
- Check internal temperature reaches 165°F for food safety
- Transfer to prepared wire rack to drain
Pro tip: After the first batch, allow oil to return to proper temperature before adding the next batch of tenders. This ensures consistent cooking and prevents soggy coating.
Let the fried chicken tenders rest on the wire rack for about 5 minutes before serving. This brief resting period allows the juices to redistribute throughout the meat and the coating to set properly.
Tips for Making Fried Chicken Tenders
The difference between good and great fried chicken tenders often comes down to these key techniques:
- Pat chicken thoroughly dry before seasoning to help coating adhere better
- Don’t skip the resting time after the first dredge to help the coating bond to the chicken
- Maintain proper oil temperature throughout cooking for even browning
- Use one hand for wet ingredients and one for dry to prevent “breading hands”
| Technique | Recommendation | Why It Works |
|---|---|---|
| Oil temperature | 350°F for starting, 325-350°F while cooking | High enough to crisp quickly without burning, preventing oil absorption |
| Coating process | Double-dredge with buttermilk between | Creates layers of coating for extra crispiness |
| Batching | Never crowd the pot/pan | Maintains oil temperature and prevents tenders from sticking together |
| Testing doneness | Internal temperature of 165°F | Ensures food safety while preventing overcooking |
If you’re new to frying, start with just a couple of tenders in your first batch. This gives you a chance to perfect your technique before committing to larger batches. Remember that the chicken will continue cooking slightly after removal, so don’t overdo it.
Make-Ahead Instructions
Fried chicken tenders are at their absolute best when served fresh, but you can prepare components ahead of time to streamline the cooking process:
You can marinate the chicken in buttermilk for up to 24 hours before cooking. The longer marinating time will make the chicken even more tender and flavorful. Simply keep it refrigerated in an airtight container.
The seasoned flour mixture can be prepared up to 5 days in advance. Store it in a sealed container at room temperature, and give it a quick whisk before using to redistribute the seasonings.
For partially prepared tenders, you can bread the chicken completely up to 30 minutes before frying. Arrange them on a baking sheet in a single layer in the refrigerator. Any longer than this and the coating may become soggy.
When ready to serve, follow the standard frying instructions, allowing a bit of extra cooking time if the chicken is cold from refrigeration.
Storing Leftovers
Proper storage is essential for maintaining food safety and preserving the texture of your fried chicken tenders:
Allow leftover tenders to cool completely before storing, but don’t leave them at room temperature for more than 2 hours. Place them in an airtight container lined with paper towels to absorb excess moisture. Store in the refrigerator for up to 3 days.
For best results, arrange tenders in a single layer in your storage container. If you need to stack them, place parchment paper between layers to prevent them from becoming soggy.
To reheat refrigerated tenders, place them on a wire rack over a baking sheet in a preheated 375°F oven for 10-15 minutes. This method helps restore crispiness better than microwave reheating.
Freezing Fried Chicken Tenders
These fried chicken tenders freeze beautifully for make-ahead meals:
- Cool freshly cooked tenders completely on a wire rack
- Arrange in a single layer on a parchment-lined baking sheet
- Flash-freeze for 1-2 hours until solid
- Transfer to freezer-safe bags or containers, removing as much air as possible
- Label with the date and store for up to 2 months
When ready to enjoy frozen tenders, thaw overnight in the refrigerator for best results. Reheat from thawed on a wire rack over a baking sheet in a 375°F oven for 15-20 minutes until heated through and crispy.
For a quicker option, reheat directly from frozen in a 400°F oven for about 20-25 minutes, though this may slightly affect the texture.
Pro tip: For maximum crispiness when reheating frozen tenders, spritz them lightly with cooking spray before placing in the oven.
Serving Suggestions
These golden, crispy fried chicken tenders pair beautifully with countless sides and sauces:
Serve with classic dipping options like honey mustard, ranch dressing, barbecue sauce, or buffalo sauce. For a homemade touch, mix equal parts honey and mustard with a splash of mayo for an irresistible honey mustard dip.
For a complete meal, pair with fresh-cut fries or sweet potato fries, coleslaw, mac and cheese, or a crisp green salad. For a healthier option, serve alongside roasted vegetables or a grain bowl.
These tenders make excellent sliders when placed on mini buns with pickles and sauce, or can be sliced and added to salads for a protein boost. They’re also perfect for wraps with lettuce, tomato, and your favorite sauce.
For beverages, consider serving with lemonade, sweet tea, or a crisp pale ale if serving adults. The slight bitterness of the beer complements the rich, savory flavors of the chicken.
Serve immediately while hot for the best texture and flavor experience. If needed, keep warm in a 200°F oven for up to 30 minutes before serving.
FAQ
Can I use chicken breasts instead of tenderloins?
Absolutely! Slice boneless, skinless chicken breasts into strips about 1-inch wide and 4-5 inches long. These homemade tenders may cook slightly faster than store-bought tenderloins, so monitor their internal temperature carefully.
Can I make these fried chicken tenders gluten-free?
Yes, simply substitute the all-purpose flour with your favorite gluten-free flour blend. For best results, choose a blend designed for baking that contains xanthan gum. The texture might be slightly different, but they’ll still be delicious.
What’s the best oil for frying chicken tenders?
Vegetable oil, peanut oil, or canola oil work best due to their high smoke points. Peanut oil adds a subtle flavor that many prefer, but vegetable or canola oil are more neutral and allergen-friendly options.
My coating keeps falling off when frying. What am I doing wrong?
This typically happens for three reasons: 1) The chicken wasn’t dry enough before dredging, 2) The oil isn’t hot enough, or 3) You’re turning the chicken too frequently. Pat chicken very dry before starting, ensure oil reaches 350°F before adding chicken, and only flip once during cooking.
Can I bake these instead of frying?
While frying gives the authentic texture, you can bake these tenders. After breading, spray both sides with cooking spray, place on a wire rack over a baking sheet, and bake at 425°F for 15-20 minutes, flipping halfway through. The coating won’t be quite as crispy, but they’ll still be delicious.
Fried Chicken Tenders
Ingredients
- 1 ½ lb chicken tenderloins ≈ 12‑15 pieces
- 1 tsp kosher salt
- ½ tsp freshly ground black pepper
- 1 tsp garlic powder
- ½ tsp paprika
- 2 cups buttermilk
- 1 Tbsp hot sauce
- 1 tsp salt
- 2 cups all‑purpose flour
- 1 Tbsp seasoned salt
- 1 Tbsp garlic powder
- 2 tsp onion powder
- 2 tsp paprika
- 1 tsp cayenne pepper adjust to taste
- 1 tsp dried thyme
- 1 tsp black pepper
- 4 –6 cups vegetable or peanut oil enough for 2 in / 5 cm depth
Instructions
- Season the chicken – Pat tenderloins dry, then coat with salt, pepper, garlic powder, and paprika.
- Marinate – Whisk buttermilk, hot sauce, and salt. Submerge chicken; cover and refrigerate 30 minutes – 4 hours.
- Prepare dredge – In a shallow dish, combine all flour‑section ingredients. Pour ¼ cup of the marinade into a small bowl for double‑dipping.
- Heat oil – Bring 2 in / 5 cm of oil to 350 °F (175 °C) in a heavy pot or deep skillet.
- Double coat – Dredge each tender in seasoned flour, dip lightly in reserved buttermilk, then dredge again for a shaggy double coating.
- Fry – Cook 3–4 tenders at a time, keeping oil at 325–350 °F, about 3–4 minutes per batch until deep golden and 165 °F internal. Drain on a wire rack.
- Rest & serve – Let tenders rest 5 minutes so juices redistribute and the coating firms up before serving.
Notes
Cook Time: 10 minutes
Total Time: 25 minutes
Yield / Recipe Servings: 4 portions (about 12‑15 tenders)