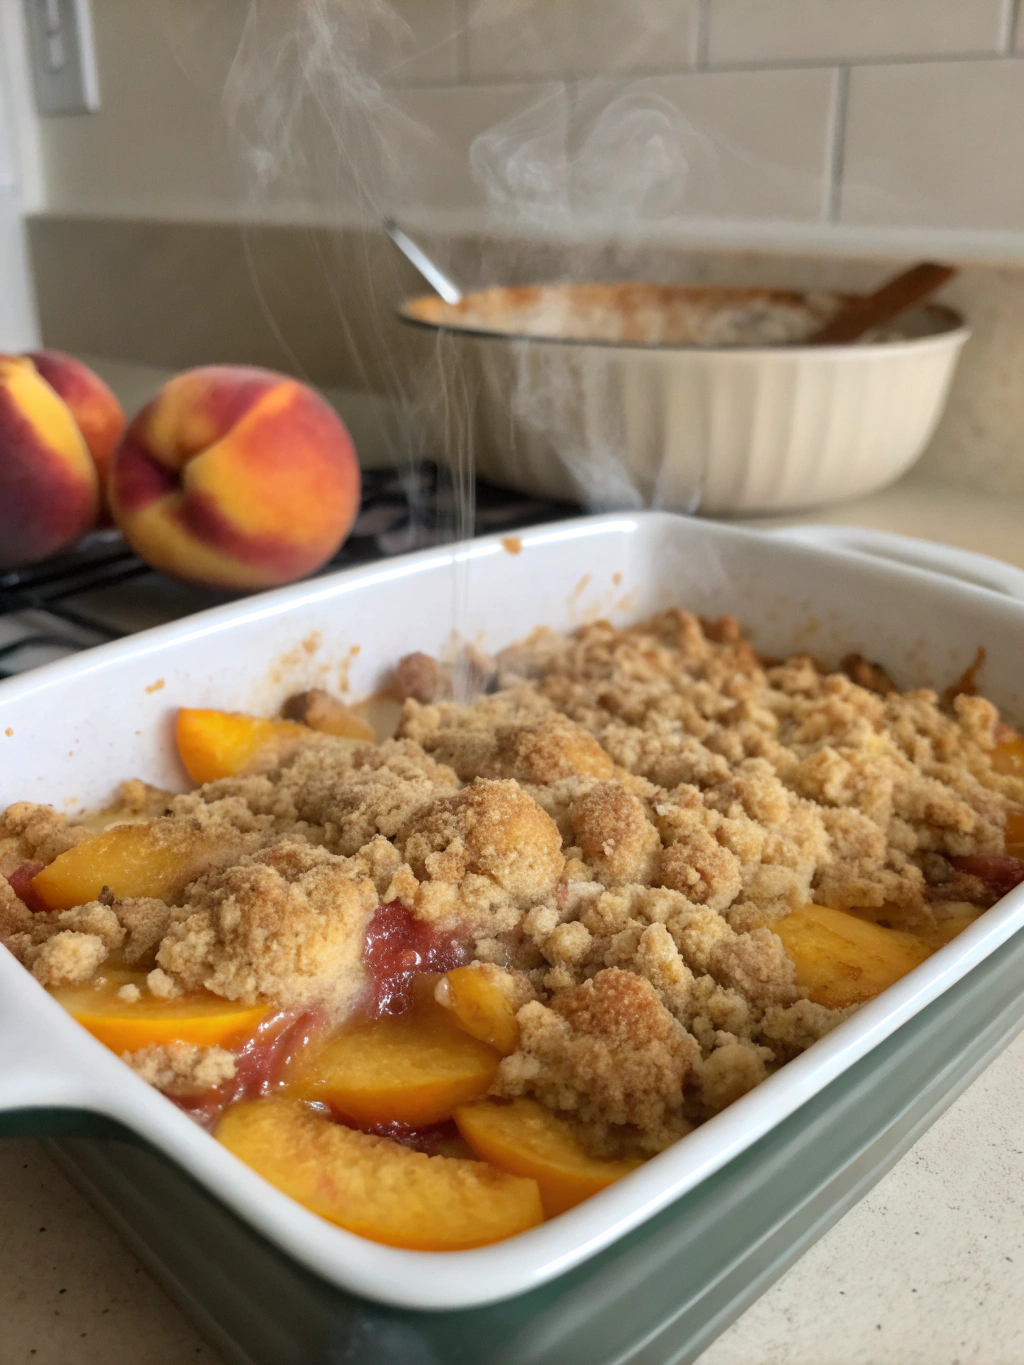
Peach Cobbler Dump Cake
This irresistibly easy peach cobbler dump cake combines juicy peaches with a buttery cake topping for the perfect balance of fruity sweetness and comforting warmth. Ready in under an hour with minimal effort!
Easy Peach Cobbler Dump Cake Recipe
There’s something magical about the combination of sweet, juicy peaches and a buttery, golden cake topping that makes peach cobbler dump cake an absolute classic. This beloved dessert has been gracing family tables for generations, offering that perfect balance of fruity goodness and comforting cake texture. What makes this peach cobbler dump cake recipe truly special is its incredible simplicity—it literally comes together in minutes, yet tastes like you spent hours in the kitchen.
Summer is the perfect time to make this delightful treat when fresh peaches are at their peak sweetness and abundance. However, the beauty of this recipe is that it works beautifully with canned peaches too, making it a year-round favorite that brings a taste of sunshine to even the coldest winter day.
THIS RECIPE:
- Uses just 5 main ingredients for maximum flavor with minimum effort
- Requires no mixing bowls—everything is assembled directly in the baking dish
- Creates the perfect balance of juicy peach filling and buttery cake topping
- Works perfectly with fresh, frozen, or canned peaches for year-round enjoyment
| Recipe Details | Information |
|---|---|
| Prep Time | 10 minutes |
| Cook Time | 45 minutes |
| Total Time | 55 minutes |
| Servings | 8-10 portions |
| Yield | 9×13-inch baking dish |
The beauty of this peach cobbler dump cake lies in its name—you literally “dump” the ingredients into a pan, layer them accordingly, and let the oven work its magic. The result is a dessert that’s part cobbler, part cake, with a delicious crispy topping and a warm, gooey peach filling underneath. This recipe is perfect for novice bakers, busy parents, or anyone who wants an impressive dessert without the fuss.
Ingredients for Peach Cobbler Dump Cake

The quality of ingredients makes all the difference in this simple recipe. Since we’re working with just a handful of components, each one contributes significantly to the final flavor. The star of the show is undoubtedly the peaches—whether fresh, frozen, or canned, their natural sweetness and juicy texture create the foundation of this wonderful dessert.
For the Peach Layer:
- 2 (29 oz) cans sliced peaches in heavy syrup (or 8 cups fresh peeled and sliced peaches + 1 cup sugar)
- 1 teaspoon ground cinnamon
- 1/4 teaspoon ground nutmeg
- 1 teaspoon pure vanilla extract
For the Cake Layer:
- 1 (15.25 oz) box yellow cake mix
- 3/4 cup (1.5 sticks) unsalted butter, thinly sliced
- 1/2 cup chopped pecans or walnuts (optional)
For Serving (Optional):
- Vanilla ice cream
- Whipped cream
- Ground cinnamon for dusting
| Ingredient Category | Recommended Quantity | Quality Tips |
|---|---|---|
| Peaches | 8 cups (fresh) or 2 (29 oz) cans | For fresh peaches, look for fruit that yields slightly to pressure and has a sweet fragrance. For canned, choose peaches in heavy syrup for best results. |
| Cake Mix | 1 (15.25 oz) box | SuperMoist or Butter varieties work exceptionally well. French Vanilla cake mix offers an extra depth of flavor. |
| Butter | 3/4 cup (1.5 sticks) | Use unsalted butter for better control of the final flavor. European-style with higher fat content creates a richer result. |
| Spices | 1 tsp cinnamon, 1/4 tsp nutmeg | Fresh, aromatic spices make a noticeable difference—replace if older than 6 months. |
| Nuts (optional) | 1/2 cup | Toast briefly before adding for enhanced flavor and crunch. |
How to Make Peach Cobbler Dump Cake
Making peach cobbler dump cake is all about proper layering—this simple technique ensures that as the dessert bakes, the cake mix absorbs the juices from the peaches while the butter melts through to create a golden, crispy topping. The process couldn’t be simpler, but the results are absolutely extraordinary.
Preheat the oven to 350°F (175°C) and lightly grease a 9×13-inch baking dish with butter or cooking spray.
Prepare the peach layer:
- If using fresh peaches: Peel, pit, and slice peaches. Mix with 1 cup sugar and let sit for 30 minutes to release juices.
- If using canned peaches: Drain half of the syrup from the cans (don’t drain completely).
Season the peaches by adding cinnamon, nutmeg, and vanilla extract. Stir gently to combine.
Pour the peach mixture into your prepared baking dish, spreading it evenly across the bottom.
Sprinkle the dry cake mix evenly over the peaches, covering the entire surface.
Arrange the butter slices across the top of the cake mix layer, trying to cover as much of the surface as possible. Any dry spots may remain powdery after baking.
Sprinkle optional nuts over the top if using.
Bake for 45-50 minutes until the top is golden brown and the peach filling is bubbling around the edges.
Let cool for at least 15 minutes before serving to allow the filling to set slightly and reach a safe temperature for eating.
Pro tip: Watch your dump cake in the final 10 minutes of baking. If some areas appear too dry, you can lightly spray those spots with cooking spray to help them brown properly.
Tips for Making Peach Cobbler Dump Cake
For a truly spectacular peach cobbler dump cake, these expert tips will elevate your dessert from good to unforgettable:
- Don’t fully drain canned peaches – The syrup adds moisture and sweetness to the cake layer
- Cut butter into thin slices rather than cubing for more even distribution
- Cover as much of the cake mix as possible with butter to avoid dry patches
- Check for doneness by looking for bubbling edges and a golden-brown top
| Technique | Recommendation | Why It Works |
|---|---|---|
| Butter placement | Thin, even slices covering all dry mix | Ensures complete melting and prevents dry, powdery spots |
| Peach preparation | Reserve some juice/syrup | Creates the perfect moisture balance in the finished dessert |
| Baking position | Center rack of oven | Promotes even browning and thorough cooking |
| Texture enhancement | Add 1/2 cup oats to cake mix | Creates a more cobbler-like, crispy top texture |
When working with fresh peaches, the ripeness matters tremendously. Peaches that are slightly firm but fragrant will hold their shape better during baking, while very ripe peaches will break down more and create a jammier filling. Both are delicious—choose based on your texture preference.
Make-Ahead Instructions
Peach cobbler dump cake is wonderfully adaptable for those who like to plan ahead. Here’s how to prepare components in advance:
You can assemble the entire peach cobbler dump cake up to 24 hours before baking. Prepare as directed through arranging the butter slices on top, then cover tightly with plastic wrap and refrigerate. When ready to bake, remove from the refrigerator, let stand at room temperature for 20 minutes, then bake as directed, adding 5-10 extra minutes to the baking time.
For longer advance preparation, you can prepare just the peach filling up to 3 days ahead. Store it in an airtight container in the refrigerator, then proceed with the assembly just before baking.
If using fresh peaches, you can peel, slice, and freeze them for up to 3 months. Thaw completely before using, and drain excess liquid before assembling your dump cake.
When reheating a fully baked but refrigerated dump cake, cover with foil and warm in a 300°F oven for about 20 minutes until heated through.
Storing Leftovers
Proper storage ensures your peach cobbler dump cake remains delicious for several days after baking:
Store any leftover peach cobbler dump cake covered in the refrigerator for up to 5 days. While the dessert is safe at room temperature for up to 24 hours, refrigeration preserves the flavor and texture better, especially during warmer months.
For optimal texture, store your dump cake in the original baking dish, covered tightly with plastic wrap or aluminum foil. The airtight seal prevents the cake from absorbing refrigerator odors while maintaining moisture.
Individual portions can be stored in airtight containers for grab-and-go convenience. When ready to enjoy, reheat individual servings in the microwave for 30-45 seconds until warmed through, or place a larger portion in a 325°F oven for 10-15 minutes.
Pro tip: Add a small pat of butter on top when reheating larger portions in the oven to restore some of that fresh-baked moisture and richness.
Freezing Peach Cobbler Dump Cake
Freezing this dessert is a great way to preserve it for future enjoyment:
To freeze peach cobbler dump cake, first allow it to cool completely. For best results, freeze it before adding any toppings like ice cream or whipped cream. You can freeze the entire cobbler or cut it into individual portions.
For whole cobblers:
- Cool completely
- Cover the baking dish with a layer of plastic wrap, pressing it against the surface
- Add a layer of aluminum foil and label with the date
- Freeze for up to 3 months
For individual portions:
- Cut into serving sizes
- Wrap each piece tightly in plastic wrap
- Place wrapped pieces in a freezer-safe container or zip-top bag
- Freeze for up to 3 months
When ready to enjoy, thaw overnight in the refrigerator. For best texture, reheat in a 325°F oven for 20-25 minutes until warmed through. If reheating from frozen, cover with foil for the first 30 minutes of reheating, then uncover for the final 10-15 minutes to restore some crispness to the top.
Serving Suggestions
Elevate your peach cobbler dump cake with these complementary serving ideas:
The classic way to serve this dessert is warm with a scoop of vanilla ice cream melting slowly over the top—the contrast of warm cobbler and cold ice cream creates an irresistible sensation. For a lighter option, freshly whipped cream with just a touch of vanilla makes a wonderful topping.
For special occasions, consider these elevated serving ideas:
- Drizzle with caramel sauce and a sprinkle of sea salt
- Add a dollop of crème fraîche and a sprinkle of candied ginger
- Serve with a small glass of dessert wine like Sauternes or ice wine
- Top with mascarpone whipped cream and a dusting of cinnamon
This dessert is best served warm but not hot—about 15 minutes after removing from the oven allows the filling to set slightly while maintaining that wonderful warm comfort. For beverage pairings, consider coffee, hot tea, or cold milk for family meals, or a sweet dessert wine for adult gatherings.
FAQ
Can I use fresh peaches instead of canned?
Absolutely! You’ll need about 8 cups of peeled, sliced fresh peaches. Since fresh peaches aren’t packed in syrup, add 1 cup of granulated sugar and let them sit for 30 minutes to release their juices before proceeding with the recipe. This creates the needed moisture for the cake mix.
My cake mix still has dry patches after baking. What went wrong?
This typically happens when the butter doesn’t completely cover the cake mix during baking. For best results, slice the butter very thinly and arrange the slices to cover as much of the cake mix as possible. Alternatively, you can melt the butter and drizzle it evenly over the cake mix, or spray any dry patches with cooking spray halfway through baking.
Can I make this recipe with other fruits?
Yes! This flexible recipe works beautifully with many fruits. Try it with apple pie filling and cinnamon cake mix, cherry pie filling and chocolate cake mix, or blueberry pie filling with lemon cake mix. The basic technique remains the same regardless of the flavor combination.
Is this really a cobbler? It seems more like a cake.
You’re right to be curious! This dessert is a hybrid that’s become known as “dump cake” because of the preparation method. Traditional cobbler has a biscuit-like topping, while this has more of a cake-like texture. It captures elements of both cobbler and cake, which is why it’s so uniquely delicious.
Can I reduce the sugar in this recipe?
If you’re looking to reduce sugar, choose peaches packed in juice rather than heavy syrup, or use fresh peaches and reduce the added sugar to 1/2 cup. You can also use a reduced-sugar cake mix. The dessert will be less sweet but still delicious.