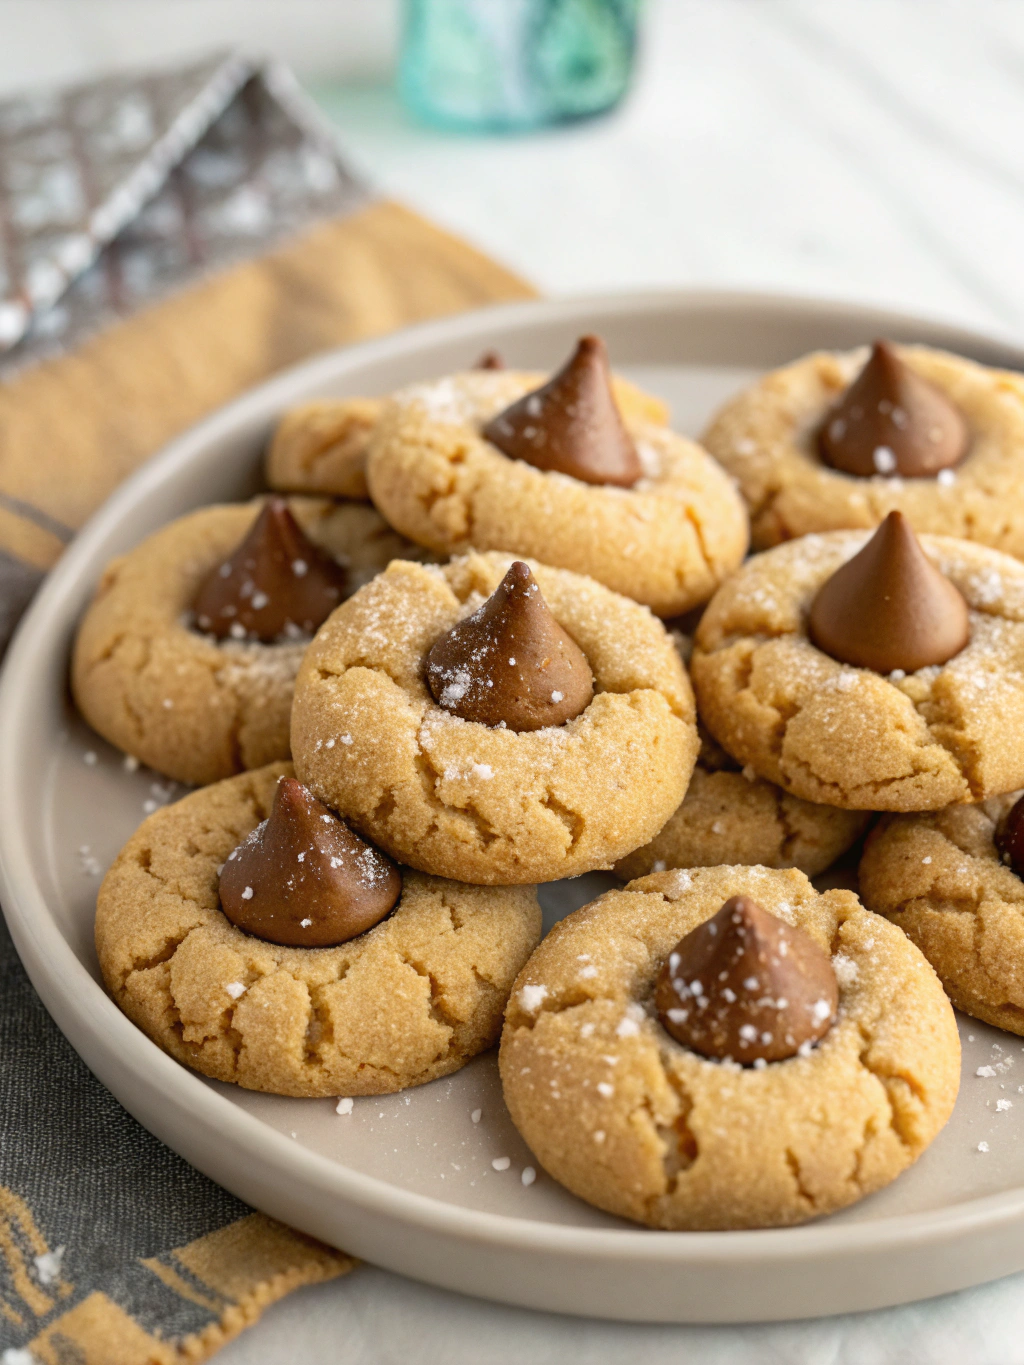
Peanut Butter Blossom Cookies
These soft, chewy peanut butter cookies topped with a chocolate kiss are the perfect balance of sweet and salty. A beloved holiday tradition that’s simple enough for any day of the year!
Easy Peanut Butter Blossom Cookies Recipe
There’s something undeniably magical about peanut butter blossom cookies. That perfect marriage of rich, nutty peanut butter dough with a chocolate kiss pressed into the center creates one of America’s most beloved cookie creations. I’ve been baking these peanut butter blossoms for holiday cookie exchanges and family gatherings for years, and they never fail to disappear within minutes!
These classic cookies have been gracing cookie platters since the 1950s when they were first introduced at the Pillsbury Bake-Off. What makes the recipe truly special is how it transforms simple pantry ingredients into something extraordinary. The slight saltiness of the peanut butter perfectly balances the sweet chocolate kiss, creating that irresistible flavor combination we all crave.
THIS RECIPE:
- Requires just 10 minutes of prep time
- Uses basic pantry ingredients you likely already have
- Creates perfectly soft, chewy cookies every time
- Freezes beautifully for make-ahead convenience
| Recipe Details | |
|---|---|
| Prep Time | 10 minutes |
| Cook Time | 12 minutes |
| Total Time | 22 minutes |
| Servings | 36 cookies |
| Yield | 3 dozen |
These homemade peanut butter blossom cookies are incredibly approachable, even for novice bakers. The dough comes together in just one bowl, and the rolling and pressing process is simple enough that kids can help. What I love most about this recipe is its reliability—follow these steps and you’ll get perfectly soft, chewy cookies with that signature crackly top every single time.
Ingredients for Peanut Butter Blossom Cookies

The quality of your ingredients makes all the difference in these classic peanut butter blossom cookies. Since the recipe is so simple, each component plays an important role in the final flavor and texture. Let’s break down exactly what you’ll need:
Cookie Dough Ingredients:
- 1/2 cup (113g) unsalted butter, softened
- 1/2 cup (125g) creamy peanut butter
- 1/2 cup (100g) granulated sugar, plus extra for rolling
- 1/2 cup (100g) packed light brown sugar
- 1 large egg, at room temperature
- 2 tablespoons milk
- 1 teaspoon vanilla extract
- 1 3/4 cups (219g) all-purpose flour
- 1 teaspoon baking soda
- 1/2 teaspoon salt
For Finishing:
- 1/3 cup granulated sugar (for rolling dough balls)
- 36 chocolate kiss candies, unwrapped
| Ingredient Category | Recommended Quantity | Quality Tips |
|---|---|---|
| Peanut Butter | 1/2 cup | Use a commercial creamy peanut butter like Jif or Skippy for most reliable results; natural peanut butter can separate and affect texture |
| Sugars | 1/2 cup each of white and brown | Light brown sugar adds moisture and chewiness; make sure it’s fresh and soft |
| Butter | 1/2 cup unsalted | Use real butter, not margarine, for best flavor; must be softened, not melted |
| Chocolate Kisses | 36 pieces | Unwrap while cookies bake and keep at room temperature; cold kisses can crack when pressed into warm cookies |
Pro tip: For the most traditional flavor, stick with commercial creamy peanut butter brands rather than natural varieties. The stabilizers in commercial brands help create that perfect cookie texture and prevent spread.
How to Make Peanut Butter Blossom Cookies
Making peanut butter blossom cookies follows a classic cookie preparation method with a special finishing technique. The process is straightforward—cream the wet ingredients, add the dry ingredients, shape, bake, and finish with the chocolate kiss. The key to perfect blossoms is in the timing of adding those chocolate kisses!
Step-by-Step Instructions:
Prepare your oven and equipment: Preheat your oven to 375°F (190°C). Line two baking sheets with parchment paper and set aside. Place 1/3 cup of granulated sugar in a small bowl for rolling.
Mix the wet ingredients: In a large bowl, cream together the softened butter and peanut butter until smooth and well combined, about 2 minutes. Add both sugars and beat until light and fluffy, about 2-3 more minutes. This creaming process incorporates air, creating lighter cookies.
Add remaining wet ingredients: Beat in the egg until fully incorporated, then add the milk and vanilla extract. Mix until smooth.
Incorporate dry ingredients: In a separate bowl, whisk together the flour, baking soda, and salt. Gradually add this dry mixture to the wet ingredients, mixing on low speed just until combined. Be careful not to overmix, which can make the cookies tough.
Shape the cookies: Roll the dough into 1-inch balls (about 1 tablespoon of dough each). Roll each ball in the reserved granulated sugar to coat completely.
Arrange and bake: Place the cookie dough balls 2 inches apart on the prepared baking sheets. Bake for 8-10 minutes, until the edges are just set and the cookies appear slightly cracked on top but still soft.
Add the chocolate kisses: Remove the cookies from the oven and immediately press an unwrapped chocolate kiss into the center of each cookie. The cookie will crack around the edges – that’s exactly what you want!
Cool properly: Allow the cookies to cool on the baking sheet for 2 minutes before transferring to a wire rack to cool completely. This prevents the cookies from breaking when moved and allows the chocolate kiss to set without melting completely.
Pro tip: Have your chocolate kisses unwrapped and ready to go before the cookies come out of the oven. You’ll need to work quickly to press them into the hot cookies while they’re still soft.
Tips for Making Peanut Butter Blossom Cookies
Even though peanut butter blossom cookies are relatively simple to make, a few expert techniques can elevate them from good to exceptional:
- Use a cookie scoop for uniformly-sized cookies that will bake evenly
- Don’t overbake – remove from the oven when the edges are set but the centers still look slightly underdone
- Cool on the baking sheet for exactly 2 minutes – any less and they’ll fall apart, any more and the chocolate kisses might melt too much
| Technique | Recommendation |
|---|---|
| Mixing | Cream butter and sugars for a full 3 minutes for proper aeration |
| Dough consistency | If dough is too sticky, chill for 30 minutes before rolling |
| Sugar rolling | Roll balls completely in sugar for that signature crackly appearance |
| Kiss placement | Press chocolate kisses straight down, not at an angle, for the best presentation |
When pressing in the chocolate kisses, use just enough pressure to secure them in the cookie without pushing all the way through to the bottom. The cookie should cradle the kiss with the crackled edges creating that characteristic blossom appearance.
Make-Ahead Instructions
Peanut butter blossom cookies are perfect for planning ahead, especially during busy holiday seasons when you want to prepare multiple cookie varieties.
To make the dough ahead: Prepare the cookie dough as directed, then cover tightly and refrigerate for up to 3 days. When ready to bake, let the dough sit at room temperature for 30 minutes to make it easier to scoop and roll.
For an even more advanced preparation, you can roll the dough balls and coat them in sugar, then freeze them on a baking sheet until solid (about 1 hour). Transfer the frozen dough balls to an airtight container or freezer bag and freeze for up to 3 months. When ready to bake, place the frozen dough balls on prepared baking sheets and add 1-2 minutes to the baking time.
Pro tip: Don’t add the chocolate kisses until after baking, regardless of how far in advance you prepare the dough. Keep them unwrapped and ready to press into the hot cookies as soon as they come out of the oven.
Storing Leftovers
Properly stored peanut butter blossom cookies will maintain their quality and flavor for several days:
Store completely cooled cookies in an airtight container at room temperature. Place sheets of parchment or wax paper between layers to prevent the chocolate kisses from sticking to other cookies. Properly stored, these cookies will remain fresh for 5-7 days.
For maximum freshness, add a slice of sandwich bread to the container – the cookies will absorb the moisture from the bread, keeping them soft and chewy. Replace the bread slice when it becomes stale.
Food safety note: Because these cookies contain butter and egg, they should not be left out uncovered for extended periods, particularly in warm weather.
Freezing Peanut Butter Blossom Cookies
Peanut butter blossom cookies freeze beautifully, making them perfect for advance holiday preparation:
- Allow the baked cookies to cool completely, including the chocolate kiss.
- Place the cookies in a single layer on a baking sheet and freeze until solid (about 1-2 hours).
- Transfer the frozen cookies to an airtight container or heavy-duty freezer bag, placing parchment paper between layers.
- Label with the date and freeze for up to 3 months.
When you’re ready to enjoy, thaw the cookies at room temperature for about 1-2 hours. If desired, refresh them by warming in a 300°F oven for 3-4 minutes.
Pro tip: For the freshest-tasting frozen cookies, double-wrap them by placing the container inside a freezer bag to prevent any freezer odors from affecting the flavor.
Serving Suggestions
Peanut butter blossom cookies are versatile enough to enjoy in multiple ways:
Serve these classic cookies with a glass of cold milk for the traditional experience, or pair with hot coffee or tea for a cozy afternoon treat. For an elevated dessert option, sandwich vanilla or chocolate ice cream between two cookies for a delicious ice cream sandwich variation.
During the holidays, arrange peanut butter blossoms on cookie platters alongside other classics like chocolate chip, sugar cookies, and snickerdoodles for a crowd-pleasing assortment.
For a special presentation, place cookies in paper cupcake liners on a tiered stand, or package them in cellophane bags tied with ribbon for homemade gifts that everyone will appreciate.
Pairing suggestion: These cookies contain both peanut butter and chocolate, making them perfect companions for a glass of port wine or a mocha latte for adult gatherings.
FAQ
Can I use natural peanut butter in peanut butter blossom cookies?
While you can use natural peanut butter, it may affect the texture and spread of your cookies. Natural peanut butter has different oil content than commercial brands like Jif or Skippy. If using natural peanut butter, make sure it’s well-mixed and consider chilling your dough for 30 minutes before baking to prevent excessive spreading.
Can I make peanut butter blossoms without a stand mixer?
Absolutely! While a stand mixer makes the process easier, you can use a hand mixer or even mix by hand with a wooden spoon. Just be sure to cream the butter, peanut butter, and sugars thoroughly until light and fluffy, which might take a bit more elbow grease when done manually.
Why did my chocolate kisses melt too much?
If your chocolate kisses are melting too much, your cookies might still be too hot when you add them. Try allowing the cookies to cool for about 30 seconds before adding the kisses, or place the entire cookie sheet in the refrigerator for a few minutes after adding the kisses to help them set faster.
What can I substitute for the chocolate kisses?
If you don’t have chocolate kisses, you can use chocolate chunks, mini peanut butter cups, or even jam thumbprints as alternatives. For a different flavor profile, try using caramel-filled chocolate candies or mint chocolate pieces.
How do I know when peanut butter blossom cookies are done baking?
The perfect peanut butter blossom cookie should be set around the edges but still soft in the center when removed from the oven. Look for slight cracking on the top surface and a light golden color around the bottom edges. They will continue to firm up as they cool, so it’s better to slightly underbake than overbake these cookies.